
 by
by In today’s world of digital documents and smartphones, knowing how to scan on iPhone is really important. It saves time, paper and keeps your important papers handy. This guide will help you learn how to scan on iphone using the tools it comes with, so you can make the most of your device.
Scanning Documents with Your iPhone
iPhone Tools – Notes and Files app
One of the hidden gems of the iPhone is its built-in document scanning capabilities, tucked away in the Notes and Files apps.
Scanning with the Notes App
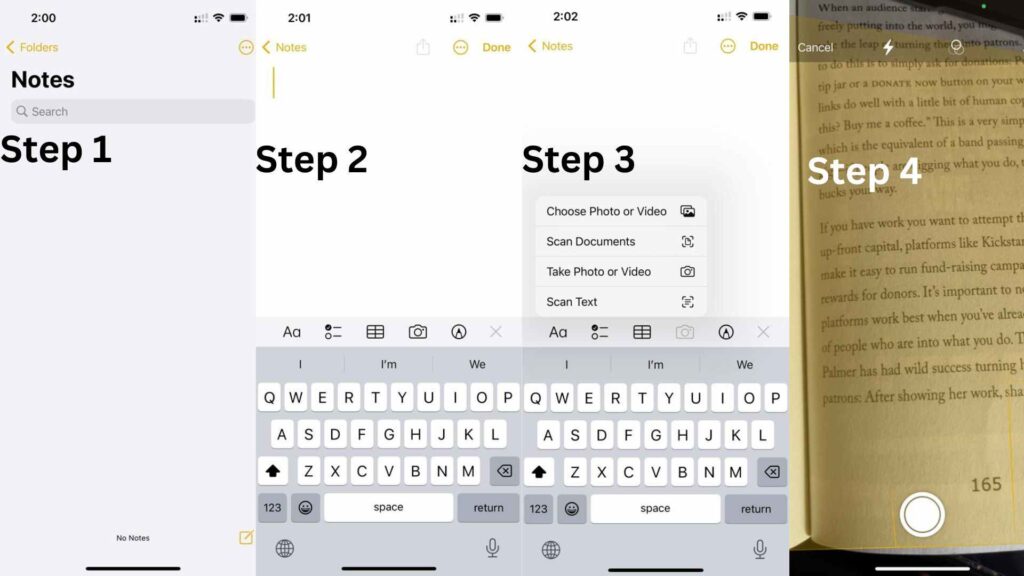
- Open the Notes app and create a new note or choose an existing one.
- Tap the camera icon, then select Scan Documents.
- Hover your iPhone over the document until it’s highlighted, and let the camera work its magic.
- Fine-tune the scan by adjusting corners and tap “Keep Scan” to save it. Additional scans can be added as needed.
Scanning with the Files App
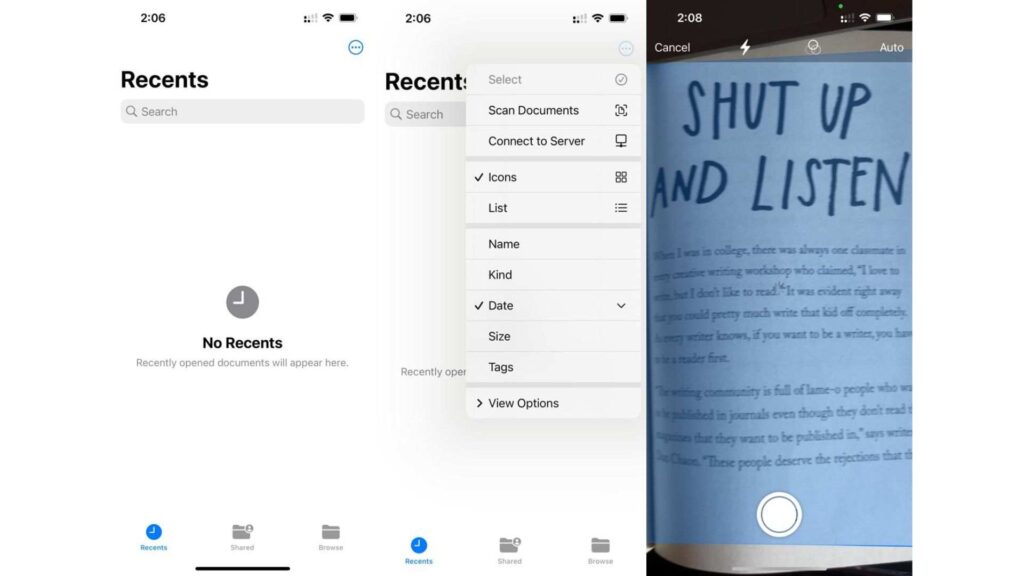
- Access the Files app and designate the location for your scan.
- Tap the button with three dots (usually in the top right corner) and then choose “Scan Documents”.
- Capture the image, make adjustments if required and tap Keep Scan.
- Save your scan as a PDF and feel free to rename it for easy identification.
Once you’ve scanned your documents, it’s time to organize and export them –
1. Open a Note or Files location containing your scanned document.
2. Tap the scanned document and click the share button in the upper right corner.
3. opt for “Save to Files” and choose a destination folder. Customize the file name as needed.
Beyond Documents and QR Codes – Expanding iPhone Scanning Capabilities
QR Code and Barcode Scanning.
Your iPhone’s camera can also handle QR codes and barcodes.
QR Code Scanning –
- Access the Camera app and hold it up to the QR code.
- Tap the link that appears beneath the code to access the linked content.
- Alternatively, utilize iOS’ built-in Code Scanner by adding it to your Control Center.
Barcode Scanning –
For various barcode-related tasks, consider specialized apps like Goodreads for tracking books, Shop Savvy for smart shopping or Barcode Scanner for handling different barcode types and creating QR codes.
Advanced Scanning with File Center – Taking iPhone Scanning to the Next Level
Sometimes, you need more advanced scanning capabilities. Enter File Center, a powerful document management software that elevates your iPhone scanning experience.
- Install a mobile scanner app like Adobe Scan from the App Store.
- Launch the app, sign in, and select the document type.
- Point your iPhone’s camera at the document, and it will automatically identify the sides.
- Adjust settings as needed, name the scanned document, and save it as a PDF.
Document Management and Beyond
But scanning is only the beginning. With File Center, you can sign documents right on your device or transfer scans to your PC:
Signing the Document – Use an Apple Pencil or your finger to sign documents directly on your device.
Transfer the Scan to Your PC – Easily transfer scanned images to your PC and manage them efficiently using File Center.
Conclusion – Your iPhone is a powerful tool for scanning documents, QR codes and more. By mastering these techniques, you can streamline your daily tasks and make the most of your device’s capabilities. So, start scanning smarter with your iPhone today and embrace the digital age.
You might like this article – https://techbailey.com/new-iphone-15-and-iphone-15-pro-max/


One thought on “iPhone Document Scanning Guide Step by Step”
Comments are closed.